May 28th, 2007 |
Published in
Documentation, Tutorial, Ubuntu
Yes, this is a howto on how you should post your Ubuntu related howto. We can all agree howtos are great, however posting them to a blog that not everyone may read, or at least they may not read it today or this year. That is why the great people within the Ubuntu Documentation Project suggest that you should post it to the Community Documentation Wiki. In order to do so, you must first create an account on Launchpad. Once you have created your account, you are ready to begin editing the wiki pages as well as creating new wiki pages. And just in case you aren’t sure about editing a wiki page, you can always send your text that you would like added to ubuntu-doc (AT) lists.ubuntu.com.
Now time for some howto howto 
Planning
- Make sure your howto isn’t already on the wiki. If it is, think about how you may better what is already there by clarifying and cleaning up the processes
- Plan on who you are writing this content for: Beginner, Intermediate, or Advanced
- Plan on your content
- Plan on your content layout
Writing
- Write your content in English first if at all possible. If not possible, see about getting it translated to English first.
- Make sure you content is understandable, prior to posting, test your howto by following the exact steps you have created. Have others help test it if needed.
- Add a section at the bottom for feedback, or start a thread in the Ubuntu Forums and link to it for feedback. Remember, what may work for you may not work for others.
Editing and Creating Wiki Pages
- First thing to do is consider a name for your howto using CamelCase or a Wiki name.
- Do not use Howto in the title
- Once you have the name, type it as http://help.ubuntu.com/community/YourHowtoName
- Use wiki formatting and try to follow and utilize the Wiki Guide at all times
- If you need help with editing wiki pages, refer to the Help Contents Wiki Page
If you have any questions or comments about editing the wiki pages, please do not hesitate to contact the Ubuntu Documentation Project by the email provided above. Also for good measure, it might be a good idea to subscribe to the Documentation mailing list. You can also catch most of us on IRC in #ubuntu-doc on the Freenode server (chat.freenode.net).
And finally, once you have it posted, feel free to blog about your new creation and link to it here so everyone may enjoy it that is reading today. Thank you for your cooperation and we look forward to the many great howtos you all have brewing inside of you.
Until next time…
May 18th, 2007 |
Published in
Debian, Development, Tutorial, Ubuntu
I have recently decided to concentrate more on the development side of Linux, more importantly Ubuntu, KDE, and now Debian. The first stage I will cover in my endeavors will be packaging. Packaging consists of taking the upstream tarballs (programname-version.tar.gz or .tar.bz2) and converting them into packages that can easily be installed in Ubuntu as well as Debian without you having to compile (configure, make, make install) or worrying about dependencies. A successful package that a majority of you are used to in Ubuntu and Debian look like programname_version.deb. Some of you have even done a successfull dpkg -i programname_version.deb for an application that either is not in the repositories or was updated and packaged somewhere else. Well this post is to cover the necessities before you jump in and go nuts trying to figure out how to correctly create a package.
Read the rest of this entry »
May 6th, 2007 |
Published in
KDE, Kubuntu, Linux, Tutorial
I have been a Yakuake user and fan for as long as I can remember. Seeing as I use the terminal roughly 75% of the time while using my computer, tabbing back and forth between either Yakuake tabs or Konsole tabs gets to be tedious after a while. Well, Sho_ and gang over at KDE have totally kicked arse with a new 2.8 Beta release. The new one still has all of the tabs, however each tab can have as many split windows as your eyes can handle. For an idea of what this looks like, take a look at the image below (click for larger image).
If you are using Kubuntu, building this package is a breeze. Save the package into a separate directory (~/downloads is what I use) and issue the following commands in the terminal (Konsole):
cd ~/downloads  #change to the directory you downloaded it to

tar -xvjf yakuake-2.8-beta1.tar.bz2

cd yakuake-2.8-beta1

./configure && make && sudo make install
NOTE: If the package does not configure properly, then you may need to install kdelibs-dev from the repositories.
To run it, simply go to KMenu->System->Yakuake.
April 3rd, 2007 |
Published in
KDE, Kubuntu, Tutorial
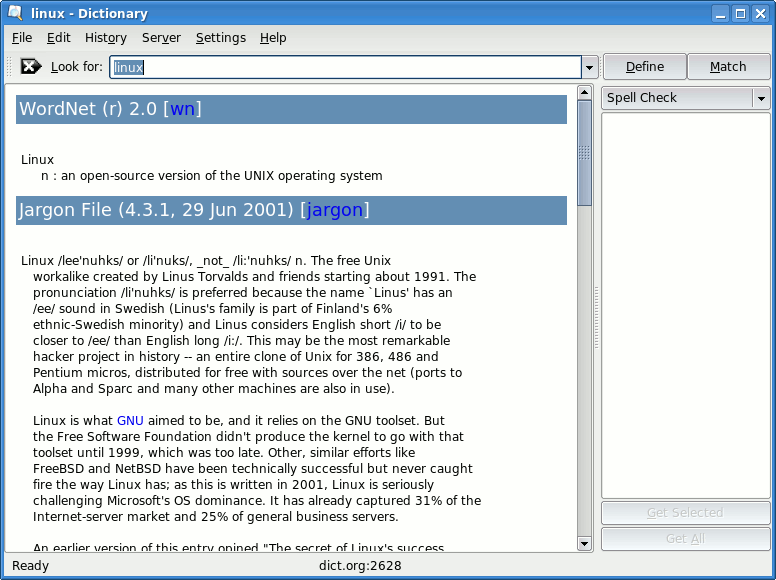
I have been using an application for years now and it has become one that I cannot live without. The application is KDict, the KDE client for the DICT protocol. It allows you to search through dictionary databases for a single word or a phrase, and then provides you with a list of definitions.
Another nice thing about KDict is that it also has a super sweet Kicker applet that will allow you to enter a word or phrase right into your Kicker, and then press enter for the output. Take a look at the following screenshots, I have searched for the word Linux, go figure
This is the Kicker applet for KDict
This is the main window with definition for Linux
So if you are interested, install the KDict package using either Adept, Synaptic, apt-get, aptitude, or whatever way you want. Once you have it installed you can access it via KMenu through the Internet submenu and then under the “More Applications” submenu. It is called the Online Dictionary which is KDict. To setup the Kicker applet, right click on your Kicker and select “Add Applet to Panel…” The click on Dictionary. Type in a word, and then press enter, you should be good to go.
March 22nd, 2007 |
Published in
Kubuntu, Tutorial
In response to Aaron’s blog posts (Part 1, Part 2) about IRSSI and libnotify to send you a notification upon highlight, well it works great in Kubuntu as well.
As you will notice, I use a different icon, a customized Konversation icon, and I have also changed the color of the popup by setting the urgency as well. The following is the shell script I am using, which is pretty much the same as Aaron’s just modified to suit my taste.
#!/bin/sh


ssh user@server ": > .irssi/fnotify ; tail -f .irssi/fnotify " |

sed -u 's/[<@&]//g' | while read heading message;

do  /usr/bin/notify-send -u critical -i <location to icon>

-t 300000 -- "${heading}" "${message}";

done
Replace user@server with your username and server IP address. Also replace <location to icon> to the correct icon location that you want to use. An example would be /usr/share/icons/crystalsvg/48×48/apps/whatever.png.
January 20th, 2007 |
Published in
Tutorial
Thanks to muzzol for the solution to the plug/unplug detection of an external USB mouse and disabling/enabling the Synaptics Touchpad. And now the answer you have all be waiting for!
Add the following line to your /etc/udev/rules.d/85-hal.rules file:
KERNEL==”mouse*”, RUN+=”/usr/bin/udevmice.sh”
Once you have added that, the next step would be to create the /usr/bin/udevmice.sh file. Here is what is in that file:
#!/bin/bash
#DATE=`date`
#FLOG=”/tmp/udev_test.log”
#echo “$DATE - [$*] - [$ACTION]” >> “$FLOG”
case $ACTION in
add)
#echo “DEBUG: conectat” >> “$FLOG”
synclient TouchpadOff=1
;;
remove)
#echo “DEBUG: desconectat” >> “$FLOG”
synclient TouchpadOff=0
;;
esac
Uncomment (remove the #) from the lines in the code if you want the script to log to /tmp/udev_test.log every time you plug/unplug your mouse. DO NOT remove the # from the #!/bin/bash line. And that concludes this tutorial. Thanks again to muzzol who left a comment in my previous post.
UPDATE: I forgot to mention that you need to make one small edit to your /etc/X11/xorg.conf file in order for the synclient command to work. Under InputDevice section, look for the Identifier for “Synaptics Touchpad”. This is where you want to add the following extra option:
Option “SHMConfig” “on”